TABLE OF CONTENTS
Motherboards these days offer several SATA connectors and M.2 slots, but setting up your drives, so they show up in your BIOS and are recognized by your OS isn’t always as straightforward as we’d like it to be.
Did you buy the wrong SSD, is it broken, or is it something else entirely that can be fixed easily?
Let’s take a look:
Causes for M.2 SSD Not Showing Up in BIOS & how to fix
An M.2 SSD should show up in your BIOS, either at the top of the BIOS screen where you can set the boot priority or in the dedicated Boot / Storage Menu.
Every BIOS looks a bit different, but here’s how this looks in an MSI BIOS – Boot Priority at the top and Storage (Boot) Menu on the left side:
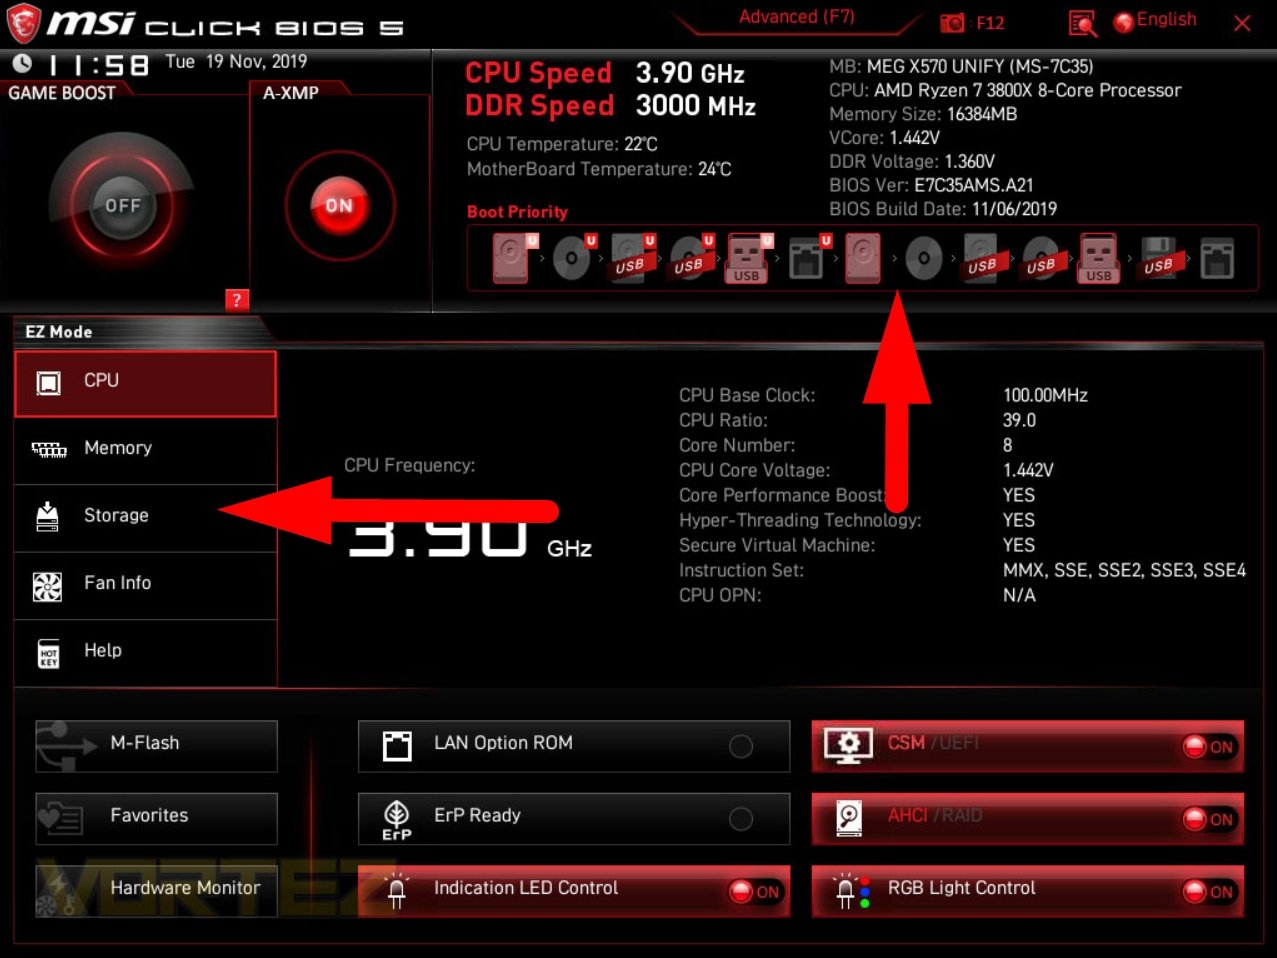
If the M.2 SSD does not appear anywhere in those two areas, here are the most common causes preventing M.2 drives from showing up in BIOS:
- Your M.2 SSD is incompatible
- Motherboard Limitations and resource sharing
- M.2 SSD Not Properly Installed
- Faulty M.2 SSD
- BIOS Not Configured Properly
Let’s go through each of these step by step:
Your M.2 SSD is incompatible
To better understand some of the compatibility causes for M.2 SSDs not showing up in BIOS, it’s crucial to know that there are different types of M.2 drives.
Types of M.2 SSD Drives
M.2 itself is just a form factor, similar to mSATA or 2.5-inch and 3.5-inch storage drives. M.2 drives can be either SATA or NVMe, which are access & transfer protocols.
Not only do the protocols between SATA and NVMe differ considerably, but the corresponding drives also have slightly different physical properties, as can be seen in the image below.
The pin layouts on the end of M.2 SSDs are divided into so-called “keys”:
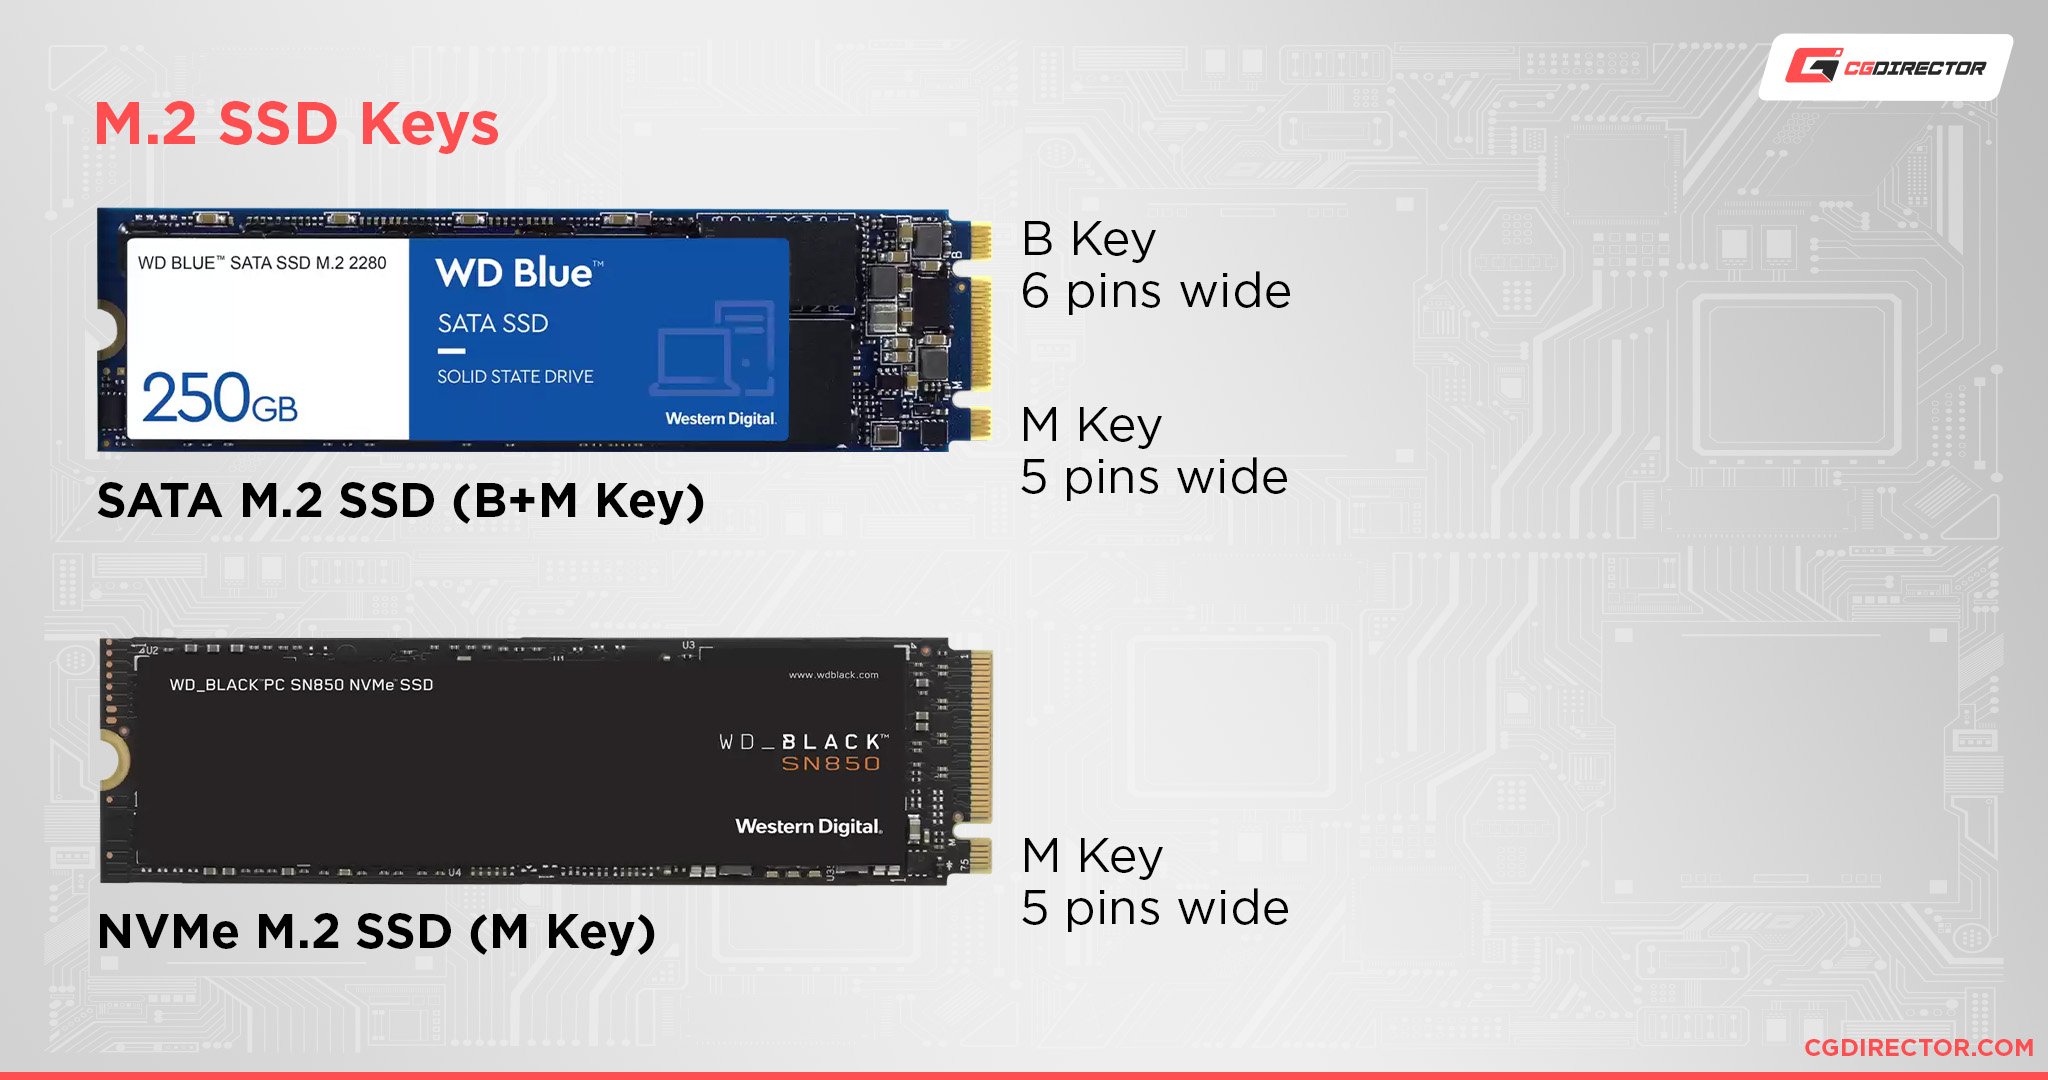
Source: Western Digital
Although the physical differences between the two are seemingly small, they are substantial: M.2 SATA drives won’t work on your Motherboard’s M.2 NVMe slots and vice versa unless they are rated for dual-mode (meaning they support both protocols).
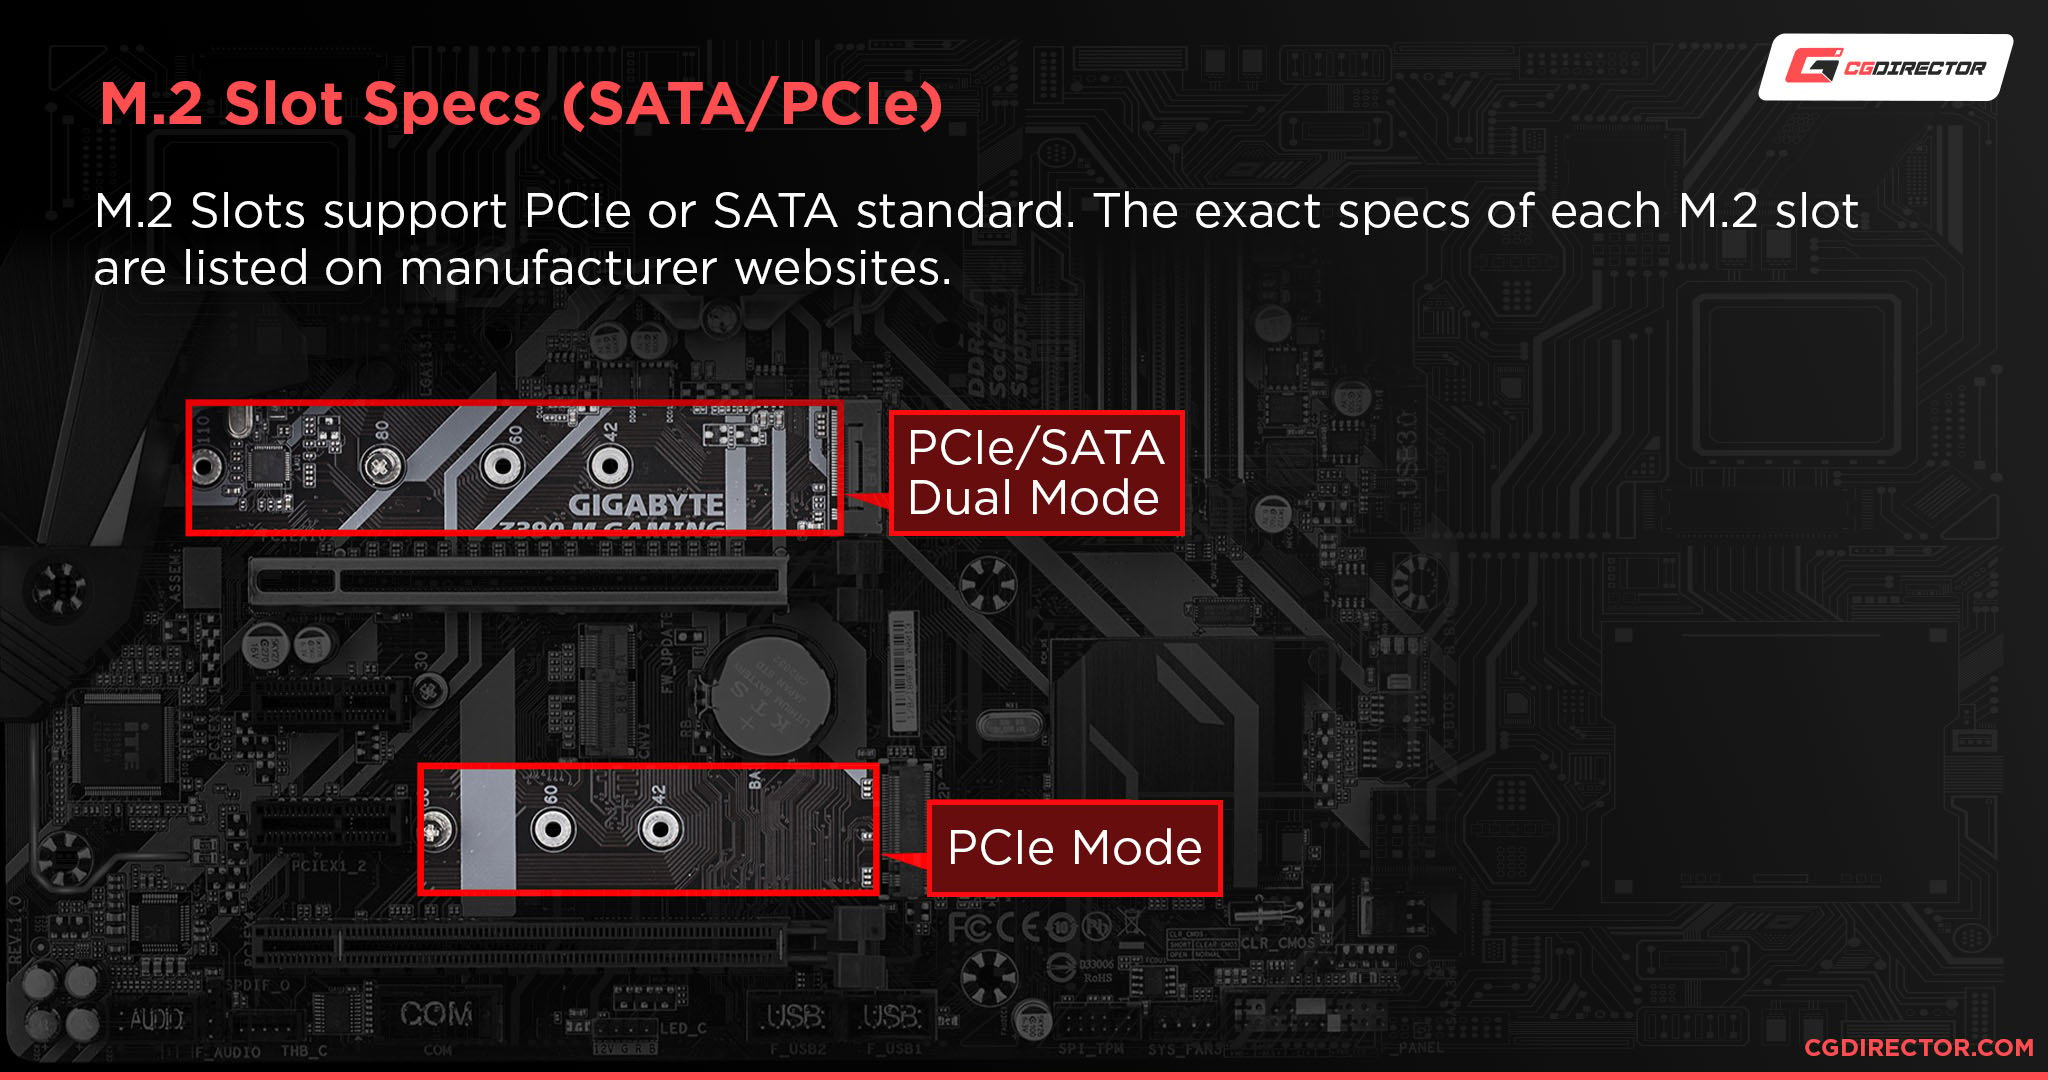
Source: GIGABYTE
Long story short: If you have a Motherboard with only M.2 SATA slots, and you have bought an NVMe M.2 SSD, you won’t be able to plug in the NVMe M.2 SSD into your M.2 SATA slots at all. So your incompatibility will be apparent even before you get so far as it not showing up in the BIOS (you won’t be able to plug it in at all).
The not-so-easy fix, in this case, is: Buy an M.2 SATA SSD instead of an M.2 NVMe SSD. Or get a new motherboard that comes with M.2 NVMe slots.
Here’s our in-depth Types of M.2 Guide if you want more info.
Well, what if your M.2 SSD fits into the M.2 slot just fine but still doesn’t show up in your BIOS?
The next step:
Motherboard limitations and resource sharing
Even if your Motherboard and M.2 SSD are physically compatible, it might be that there are electrical limitations in place.
You see, lower-end and even mid-tier Motherboards share resources (e.g., PCIe Lanes) between components, and if you have too many of one, you might not be able to use something else.
In our case, what happens often is one of the following:
- Your PCIe slots share lanes with your M.2 slots. This can disable one (or more) M.2 slots if you have too many PCIe cards installed in your PCIe slots.
- Your 2.5″/3.5″ SATA drives (regular HDDs, SSDs) share resources with your M.2 slots. If you have too many SATA storage drives installed, one or more M.2 slots might be disabled.
- When you have multiple M.2 slots, and you place a high-speed NVMe M.2 SSD into one of them, the other(s) might be disabled because of resource sharing.
- The same can be true for Thunderbolt, 10GBe LAN, or Bluetooth features, which, when in use, might disable the functionality of some of your M.2 slots.
This list can differ between motherboard brands, tiers, and chipsets, and it’s extremely complicated to wrap your head around, I agree!
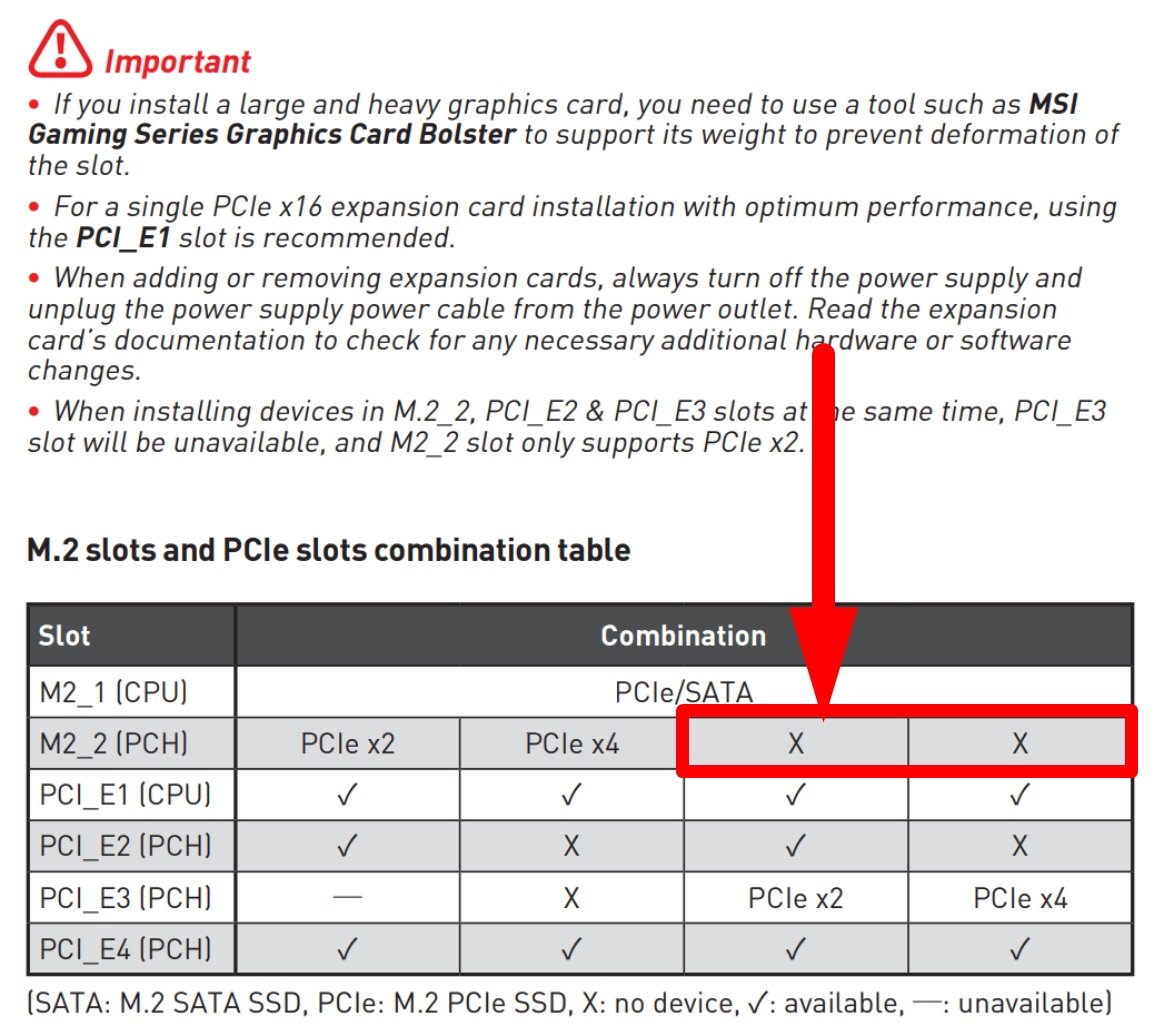
The below image was taken from a motherboard manual. At closer inspection, that table describes what happens when we have three or more PCIe Slots utilized (on that specific motherboard), the M.2 slot will be disabled.
The fix, in this specific case, is:
- Check your motherboard manual to see if your M.2 slots share resources with anything else. For testing purposes: Temporarily remove any PCIe devices and other storage drives to see if that changes anything.
Here’s how some motherboards inform you of such limitations. Such an on-screen warning display, though, is rare, and it’s best to double-check the manual yourself:

M.2 SSD Not Properly Installed
M.2 SSDs are delicate little things. It’s easy to be too gentle and not install it into its slot correctly or forget to add the screw (because it was missing?).
Sometimes you don’t use a screw at all and just place the motherboard’s heat-spreader back on top of it to hold the M.2 SSD down & in place, but this can cause the M.2 SSD to come loose.
In any case, check it’s fastened tightly and reinstall it to be safe. Here’s a quick video of how to install an M.2 drive, just to make sure you’ve thought of everything:
Faulty M.2 SSD
As we’ve mentioned above, M.2 SSDs are delicate things. They break easily. Not necessarily during installation but during shipping or even assembly in the factory and with lousy quality assurance.
The fix in this case, or rather how to check if it’s broken: See if it works in another PC… preferably a PC you know has everything properly configured for M.2 drives.
If it doesn’t work in that system either, you’re most likely looking at a faulty drive that needs to be RMA’d.
BIOS Not Configured Properly
We’ve now covered the most important physical aspects of why your M.2 SSD might not be working, but there are still some things to check and adjust on the BIOS side of things.
The root of your problem may very well be a misconfigured BIOS setting.
If you’ve just installed a brand-new M.2 drive and it’s not showing up in the BIOS, even after you’ve removed additional drives, PCIe devices, and tried the steps above, check the following settings:
- If you’re installing an M.2 NVMe SSD, make sure your motherboard has a UEFI BIOS with NVMe support and check if there’s an update available
- Set SATA Mode to AHCI: Depending on your current operating system, disk drives, and RAID configuration, you might want to switch your default SATA mode to AHCI. Navigate to (PCH) Storage Configuration and set AHCI as the default SATA Mode
- Disable Secure Boot
- Disable fast boot
- Enable CSM
- Set PCIe configuration to M.2
- Update your BIOS
Keep in mind that many of these options will be named differently and will be located in different submenus of your BIOS, depending on your motherboard’s brand and the BIOS it uses.
Consult your motherboard’s manual, which is also readily available online on your motherboard’s product support page.
More Fixes that worked for Readers
Thanks to our readers that have reached out to us with fixes that worked for them, we have rounded up a few more things you can try.
We haven’t been able to reproduce all of the following fixes, but then again, what might work for a specific motherboard brand and drive combination might not work for others:
- Disable PTT in BIOS: Intel has a so-called Intel Platform Trust Technology feature that you can enable/disable in many Motherboard’s BIOS. It’s a TPM (Trusted Platform Module) that pretty much limits what hardware is allowed to run on your PC. A Reader reached out to us stating that PTT in his BIOS kept his Kingston M.2 NVMe SSD from being recognized. Disabling PTT solved the issue. Our recommendation: If you have such a BIOS Option (PTT or TPM) give it a try!
- Let it sit: One reader mentioned that reseating the SSD, going into Windows’s UEFI Boot screen and actually waiting for 30mins, then restarting, did the trick for him. We’re not sure what the waiting accomplishes exactly and couldn’t reproduce it either. (Magic involved? Static electricity overload?) Maybe the SSD was too cold from shipping, or the reseating polished the pins. I’m guessing it’s the “turn it off and on again” that is to thank for the fix.
- For MSI BIOS, you have to change the boot hard disk priority (not the obvious option of boot drive priority) for it to show up in your boot drives list.
- When your BIOS does, but Windows doesn’t recognize the SSD: One reader reported the following solution fixed his issue.
Let us know in the comments what worked for you, so we can extend the list above and brighten someone’s day!
FAQ
How do I Enable M.2 in BIOS?
The process slightly varies from one motherboard to another, but it goes something like this:
Go to advanced settings, find the tab for Onboard Devices and look for PCI Express Slot options.
By default, most board manufacturers set it to Auto, but if you’re encountering issues, change it to M.2 mode instead.
Why Is My m.2 Drive Not Recognized in the Boot Priority List?
There are lots of possible reasons for this, but the most likely culprit is a mismatch of partitions.
If your system is running UEFI and your bootable drive uses an MBR partition, you won’t be able to boot from it.
If you’re running UEFI and the disk uses GPT, you’ll have to look elsewhere to figure this out. Check your BIOS to see if you’ve enabled M.2 slot to be bootable.
Also, try disabling fast boot and CSM and setting Secure Boot to Other OS.
Make sure you save your changes and restart before checking if your M.2 drive is now listed under boot priority.
Over to You
What are your thoughts on all this?
Have you managed to fix the issue of your M.2 not showing up in BIOS?
Has one of our tips helped you resolve this issue or did something else fix it? Let us know in the comments below or our forum.
![New M.2 SSD Not Showing Up In BIOS [How to fix] New M.2 SSD Not Showing Up In BIOS [How to fix]](https://www.cgdirector.com/wp-content/uploads/media/2022/05/M.2-SSD-Not-Showing-up-in-BIOS-Causes-and-How-to-Fix-Twitter-1200x675.jpg)
![IOR / Index of Refraction List For Common Materials [For Use In 3D Materials / Rendering] IOR / Index of Refraction List For Common Materials [For Use In 3D Materials / Rendering]](https://www.cgdirector.com/wp-content/uploads/media/2022/06/IORIndex-of-Refraction-List-for-Common-Materials-Twitter-594x335.jpg)



18 Comments
20 July, 2024
Amazing article, unhappily I tried all the options on my MSI board and the Adata SSD was not detected by the BIOS, so I’m getting other SSD brand to confirm if this is incompatibility issue
27 April, 2024
Would just like to say.
Thank you very much Mr Glawion, for this insight regarding the NVME M.2 drive not listing in the UEFI/BIOS.
I recently acquired a Gigabyte Z590 UD AC and was somewhat confused when I couldn’t see the NVME drive listed in the UEFI, while also stating no boot device found. Yet Windows was booting fine.
Spent several days looking for a definitive solution with not much luck,. I started to think I may have a faulty Motherboard like certain forums had suggested.
But coming across your article has saved the day. The fix for this Motherboard, was to disable secure boot and enable CSM. Worked like a charm.
Thanks for that.