TABLE OF CONTENTS
Nothing lasts forever — not even our computers.
They tend to slow down over time, as is only natural. Software upgrades stop becoming compatible, their parts start wearing out, and soon enough, you find yourself shelling out hundreds of dollars in an attempt to repair what needs repairing.
Simply put: our computers have an expiration date.
Every component has to reach the end of its life cycle at some point, and the older your computer becomes, the more likely it is to start showing signs of degradation.
To figure out whether you might need an upgrade or a new PC, it makes sense to check how old your PC actually is.
But first, let’s figure out the following:
What Is The Average Lifespan of a PC?
On average, computers last anywhere between three to five years. This number, however, differs for laptops and regular full-fledged PCs.
As a rule of thumb, you can expect the average lifespan of a laptop to be around three to four years. For desktops, this number is a little bit higher — around five years.
That’s just an average, though, so don’t take it as gospel.
Why does this discrepancy exist, you might ask?
It’s actually quite simple: laptops tend to run hot, and their airflow is rather limited. They are also much harder to clean and maintain. Desktops, on the other hand, are a lot easier to cool down and maintain, which, in turn, can increase their lifespan by quite a bit.

This is not a hard rule, though. The actual numbers vary from one device to another and are dependent on many different factors.
We live in an era in which technology keeps advancing at an incredible pace. And so, naturally, there comes a point when our computers can no longer keep up and deliver the kind of performance one might expect.
Computer components also tend to wear out over time because they, too, have a “shelf life.” For example, laptop batteries are good only for a certain number of recharge cycles.
Any mechanical moving parts, such as fans or cooling liquid inside tubing, too, can shorten the lifespan of your PC.
SSDs have a limited number of read & write cycles, thermal paste dries up, and radiators become caked with dust. All of this reduces performance until failure. Yes, you can lengthen your PC’s runtime by cleaning and maintaining it, but only to a certain degree.
And even if the core components such as the CPU and RAM don’t have any kind of moving parts that need maintenance, they become ever slower relative to the performance needs of modern software.
Apart from that, here are a few other reasons why our computers tend to become outdated and (relatively) slow:
- Full drives, too much bloat-ware installed and running in the background
- Taxing, drawn-out workloads
- A lack of maintenance; dust and debris can easily accumulate and affect your PC’s performance
- Overheating issues and/or improper cooling/airflow
- Frequent power surges
Sometimes, you may need to replace your entire computer and buy something new. Other times, a simple upgrade might just do the trick.
Either way, it’s important to know just how old your computer is — that way you can make an informed decision and upgrade your components at just the right moment!
So let’s answer the core question of this article:
How old is my Computer? 5 Easy Ways to Find Out.
Figuring out how old your PC is can come in handy for many reasons.
It’s not something that is inherently important to your day-to-day life, but knowing when to upgrade is arguably just as important as knowing what to upgrade to.
In any case, it’s something you definitely need to keep track of! Here are five quick ways to find out:
1. Check The Serial Number
Unless you have a custom PC and assembled the device yourself, your pre-built desktop or laptop must have a sticker with its serial number on it.
This serial number is your computer’s unique identifier. You can use it to access various information regarding your computer and its components.
In the case of pre-built desktops, this sticker can usually be found on the back of the case.
Laptops, on the other hand, will have this sticker somewhere on the bottom panel or, in extremely rare cases, behind the removable battery. Sometimes, this information may be contained within a QR code (which, when scanned, will just link to an online support page).
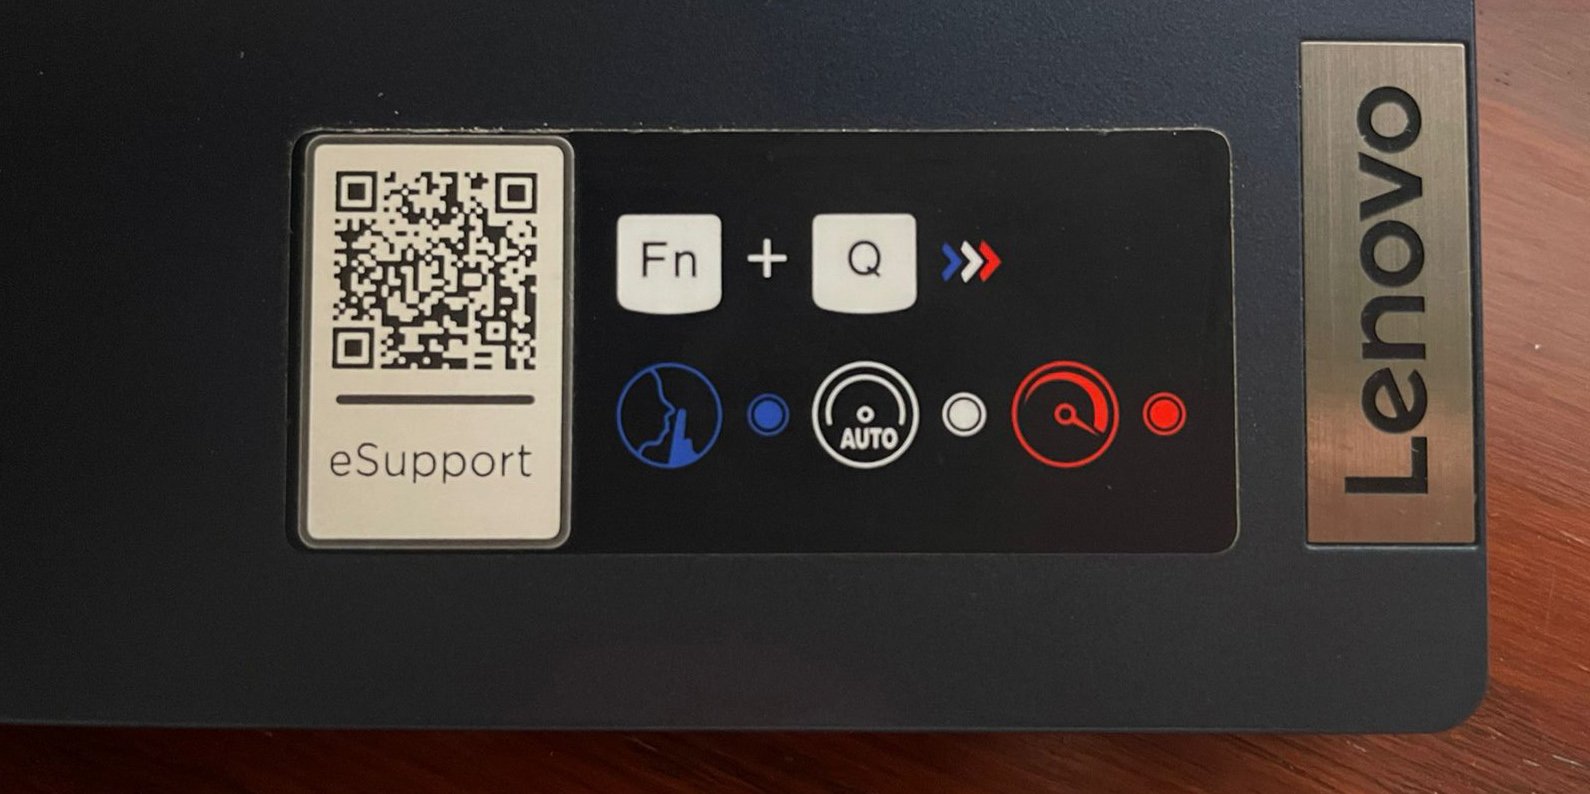
Image Credit: Lenovo
Once you find the serial number, type it into Google. The company that manufactured your PC (or its website, rather) should pop up.
On it, you’ll find all the information you need about your computer and its manufacturing date. This exact method can also be used to find out the manufacturing date for each separate component within your build.
But what happens if there’s no sticker whatsoever? Or, alternatively, there is one but its contents have been rubbed off?
Go to Start, type System Information, and then press Enter.
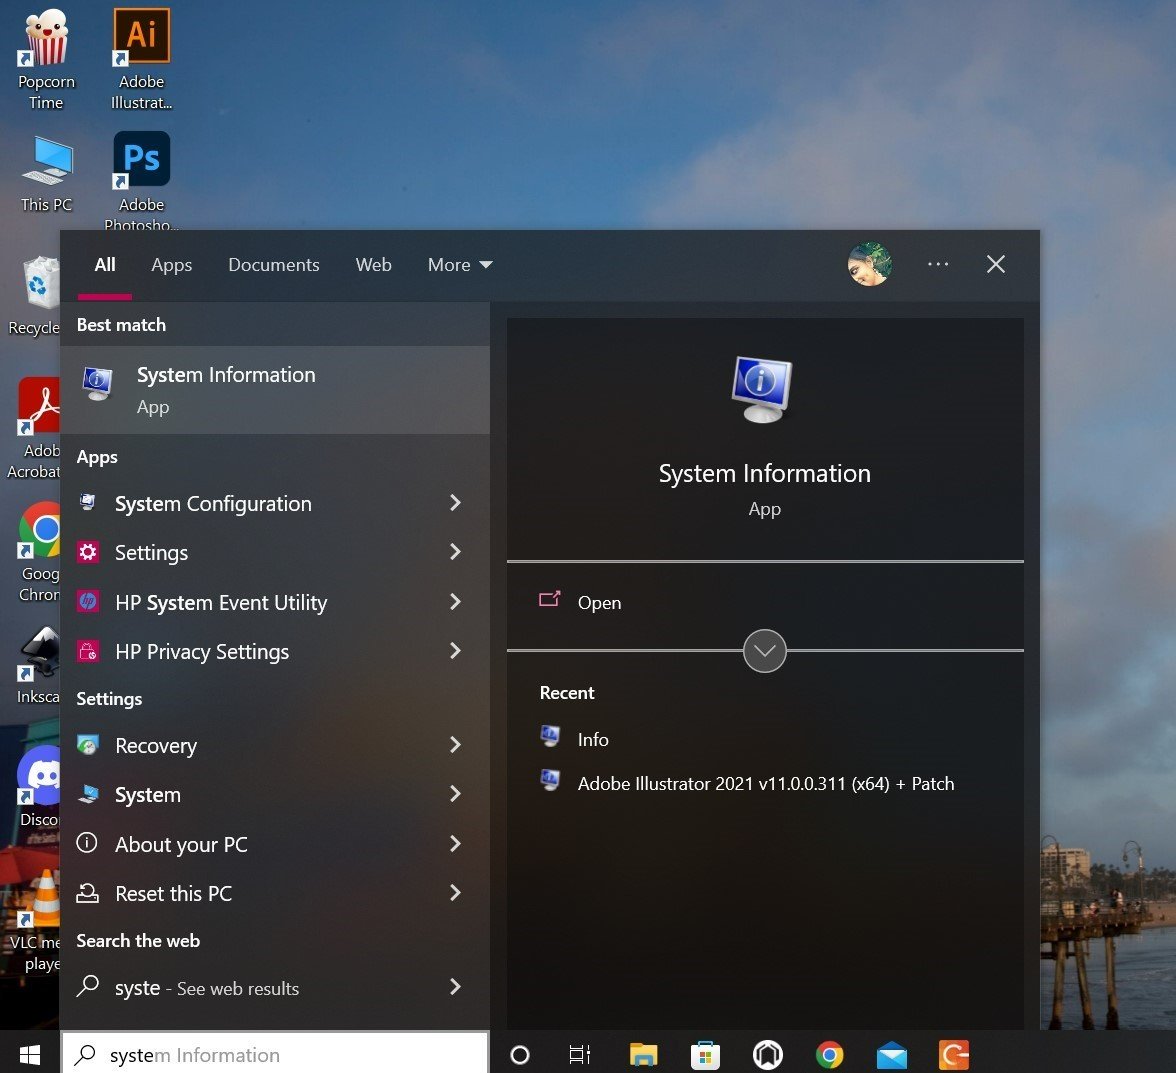
Under System Summary, you will find detailed information regarding your computer.
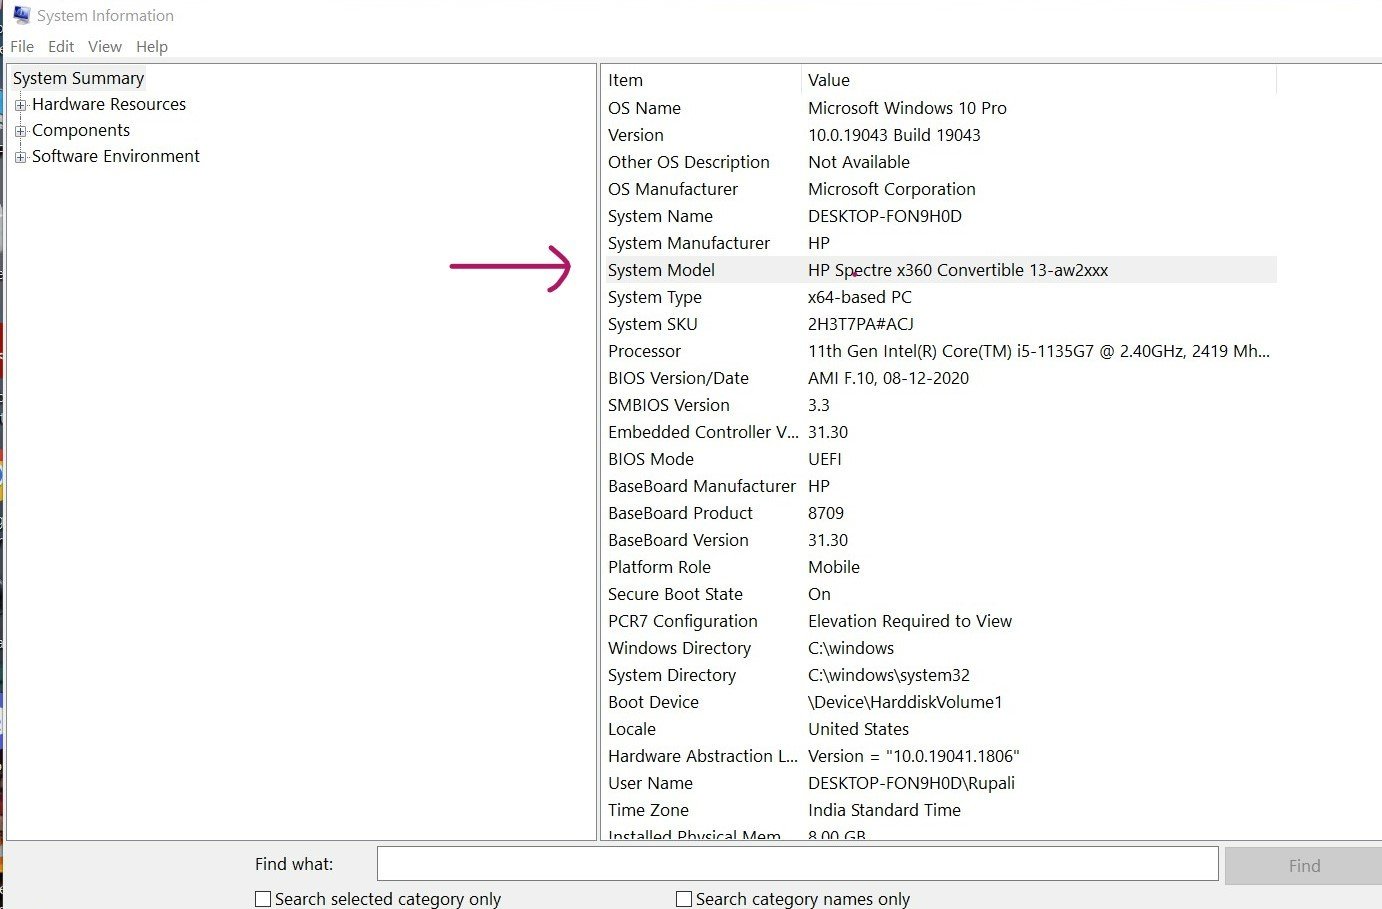
Type in this information into Google to find out the approximate age of your computer.
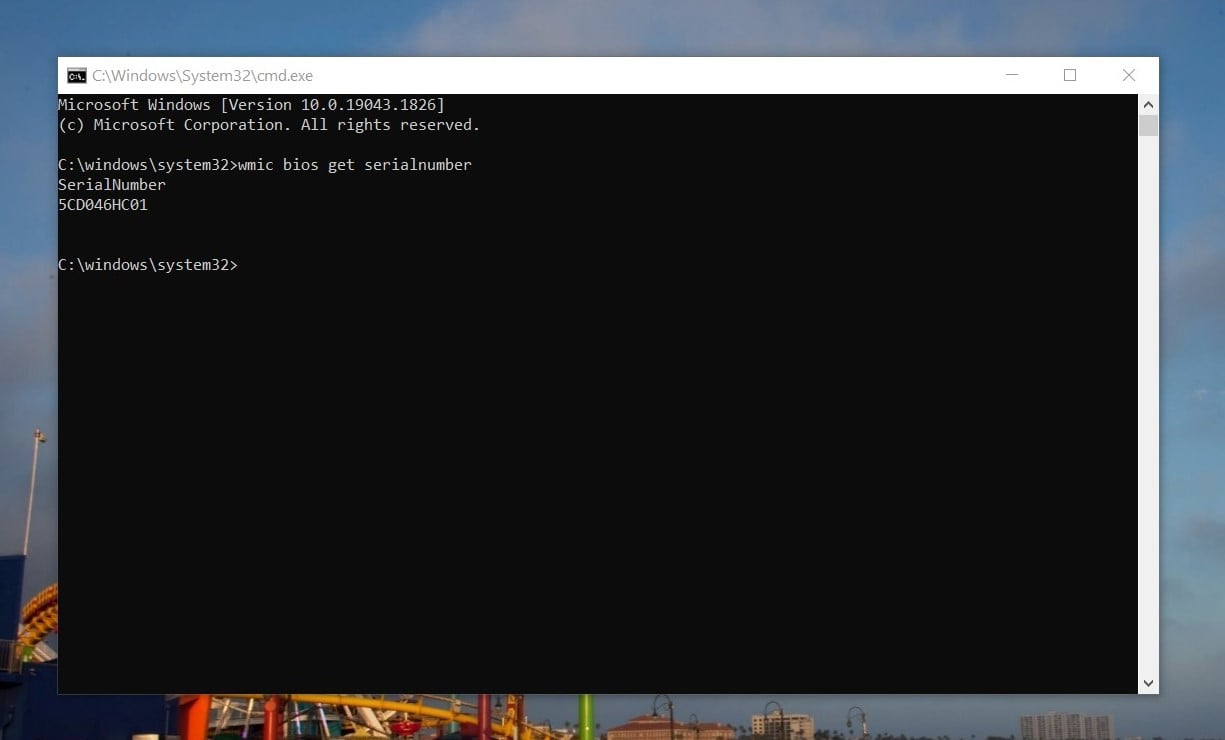
Another method to check your computer’s serial number is through the command prompt. Open up the Windows Start menu, type in cmd, and open the Command Prompt.
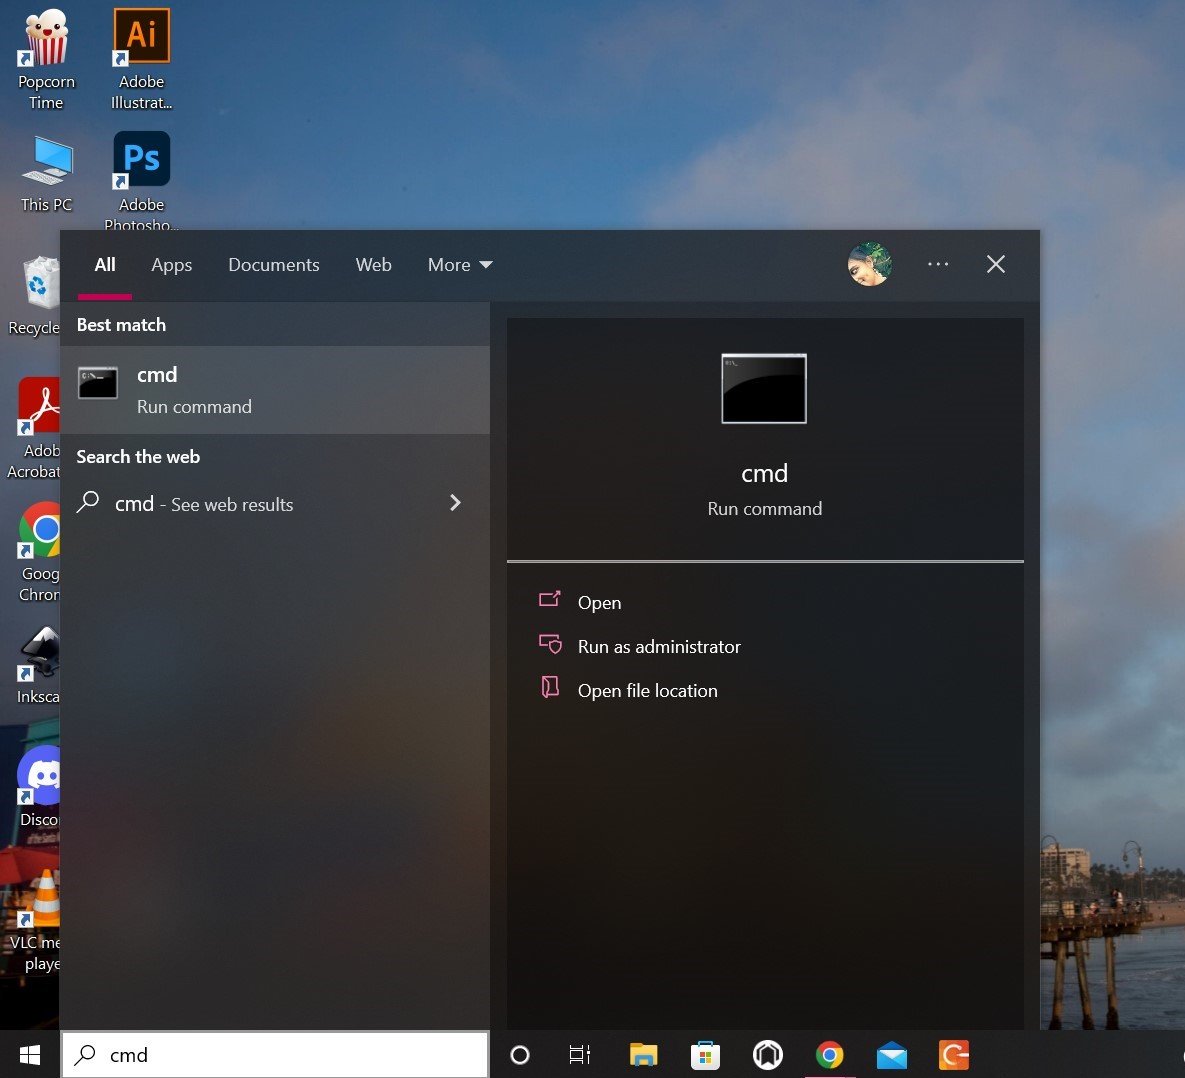
Type the following command: wmic bios get serialnumber.
Voila! Your computer’s serial number should now be displayed.
This method does have one drawback: it only works if you purchased a pre-built PC where an OEM (original equipment manufacturer) has filled out this information for you.
If you have a custom-built device, keep on reading!
2. Check Your BIOS Version
You can get a detailed summary of your BIOS by using the systeminfo.exe command tool.
This will give you the age of your motherboard’s BIOS, which, in certain scenarios, can be a good indicator of how old your computer is (If you’ve never updated your BIOS).
Go to Start, type cmd, and open the Command Prompt. Type the following command: systeminfo.
You will be presented with a bunch of different information. What you need, though, is the BIOS version data.
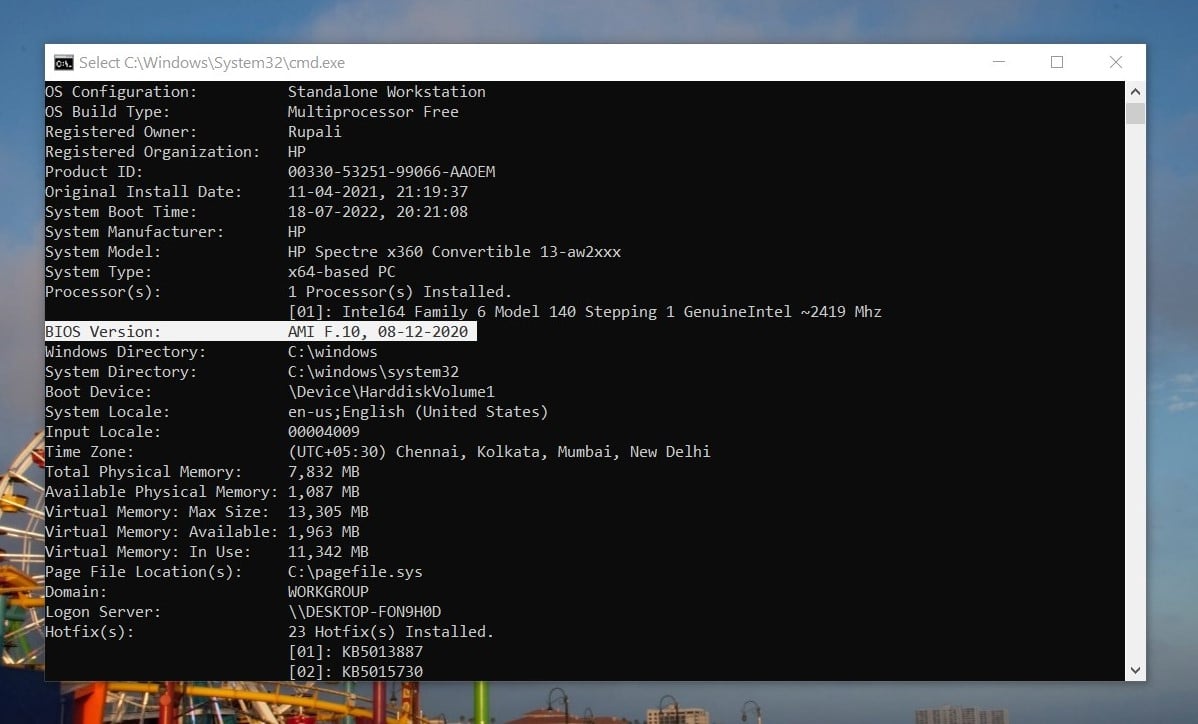
Beside the BIOS Version, you will see a date — it indicates a rough estimate of when your motherboard was manufactured.
Note: If its BIOS was ever updated — or if you had purchased a used device and have no idea whether its previous owner tinkered with it — you absolutely have to take this date with a grain of salt.
The BIOS Version also just tells you the date at which the BIOS Firmware was compiled. NOT when it was written to the motherboard’s CMOS, or when the motherboard was manufactured exactly. But it should be close – by a few months.
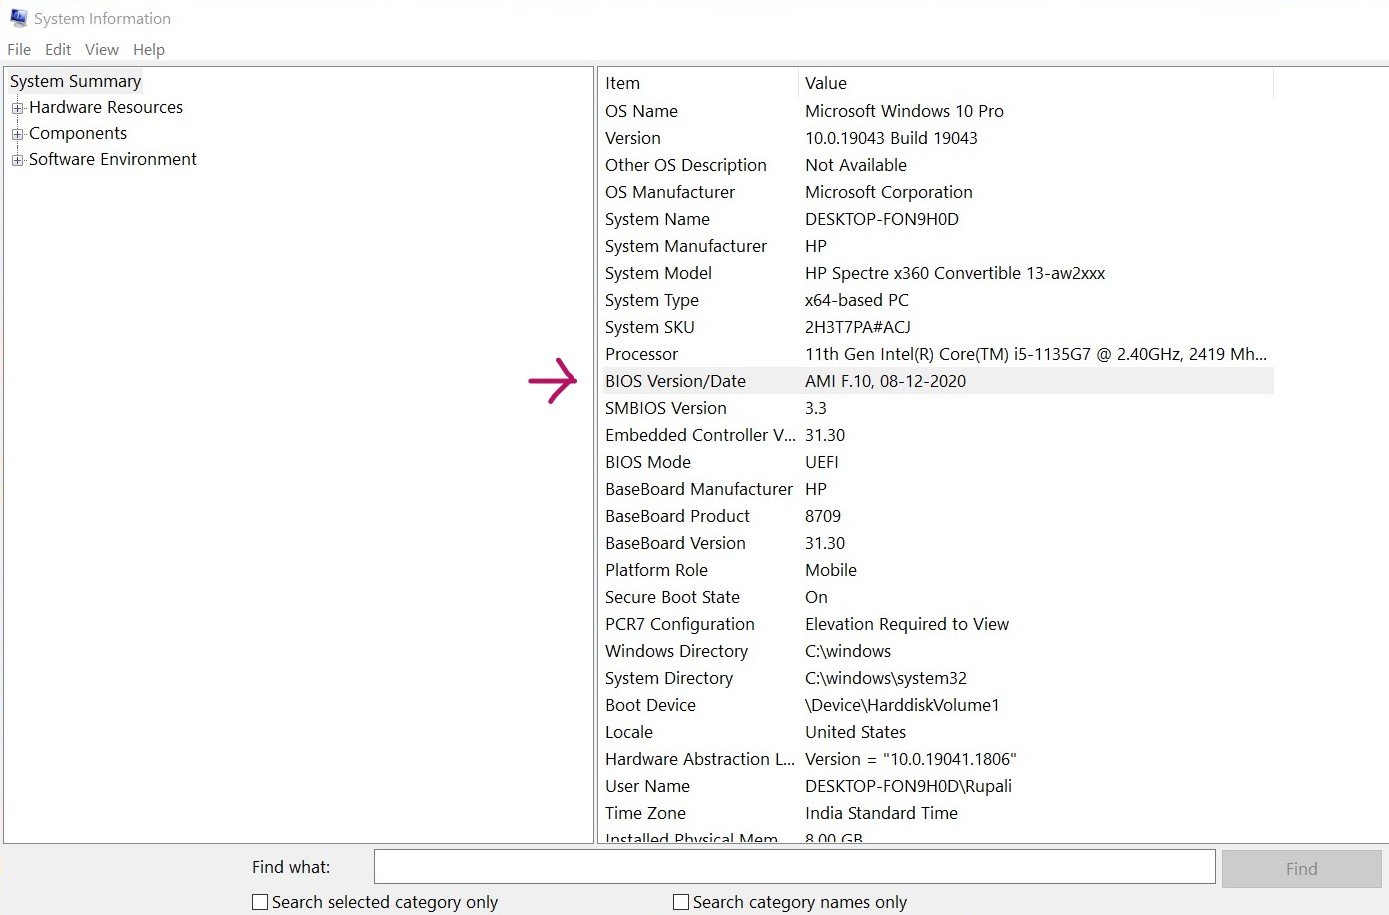
Another way to check your BIOS version is through the System Information app.
Go to Start and type msinfo32.exe and click Open. This will launch System Information. Under System Summary, you will find BIOS Version/Date.
3. Check Your CPU’s Release Date
Because new PCs are (more often than not) sold with the most recent components on the market, checking the release date of your processor is another way to determine how old your computer is. You will find this information in the System Information app.
Go to Start, type System Information, and open the app. Under System Summary, you will find the name of your processor.
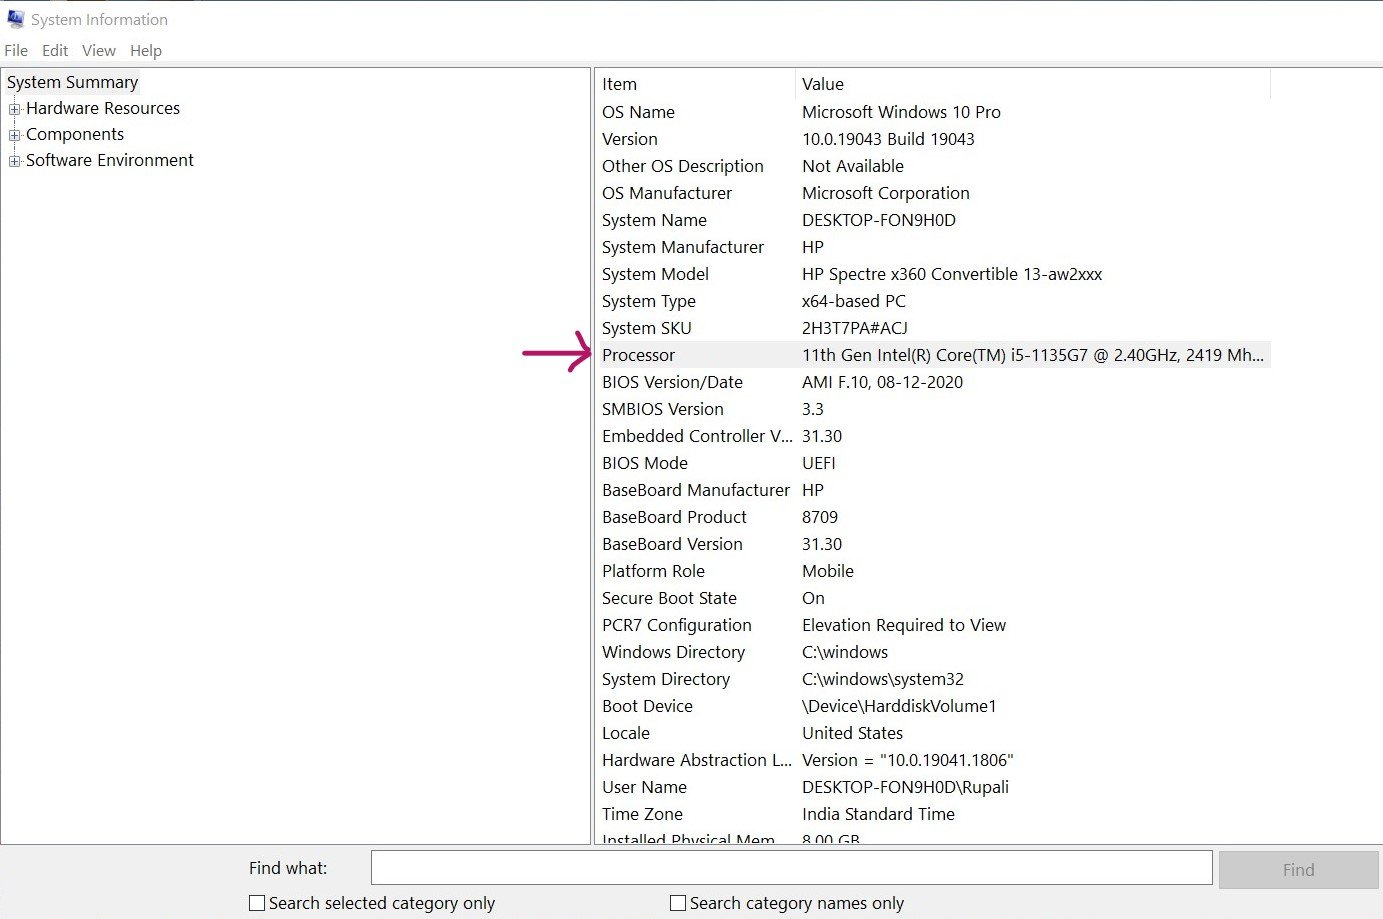
Now head over to Google and type in the full name of your CPU along with the keywords “launch date.”
The information you need will be neatly presented near the very top of the page — you won’t have to look any further than the first two or three links.
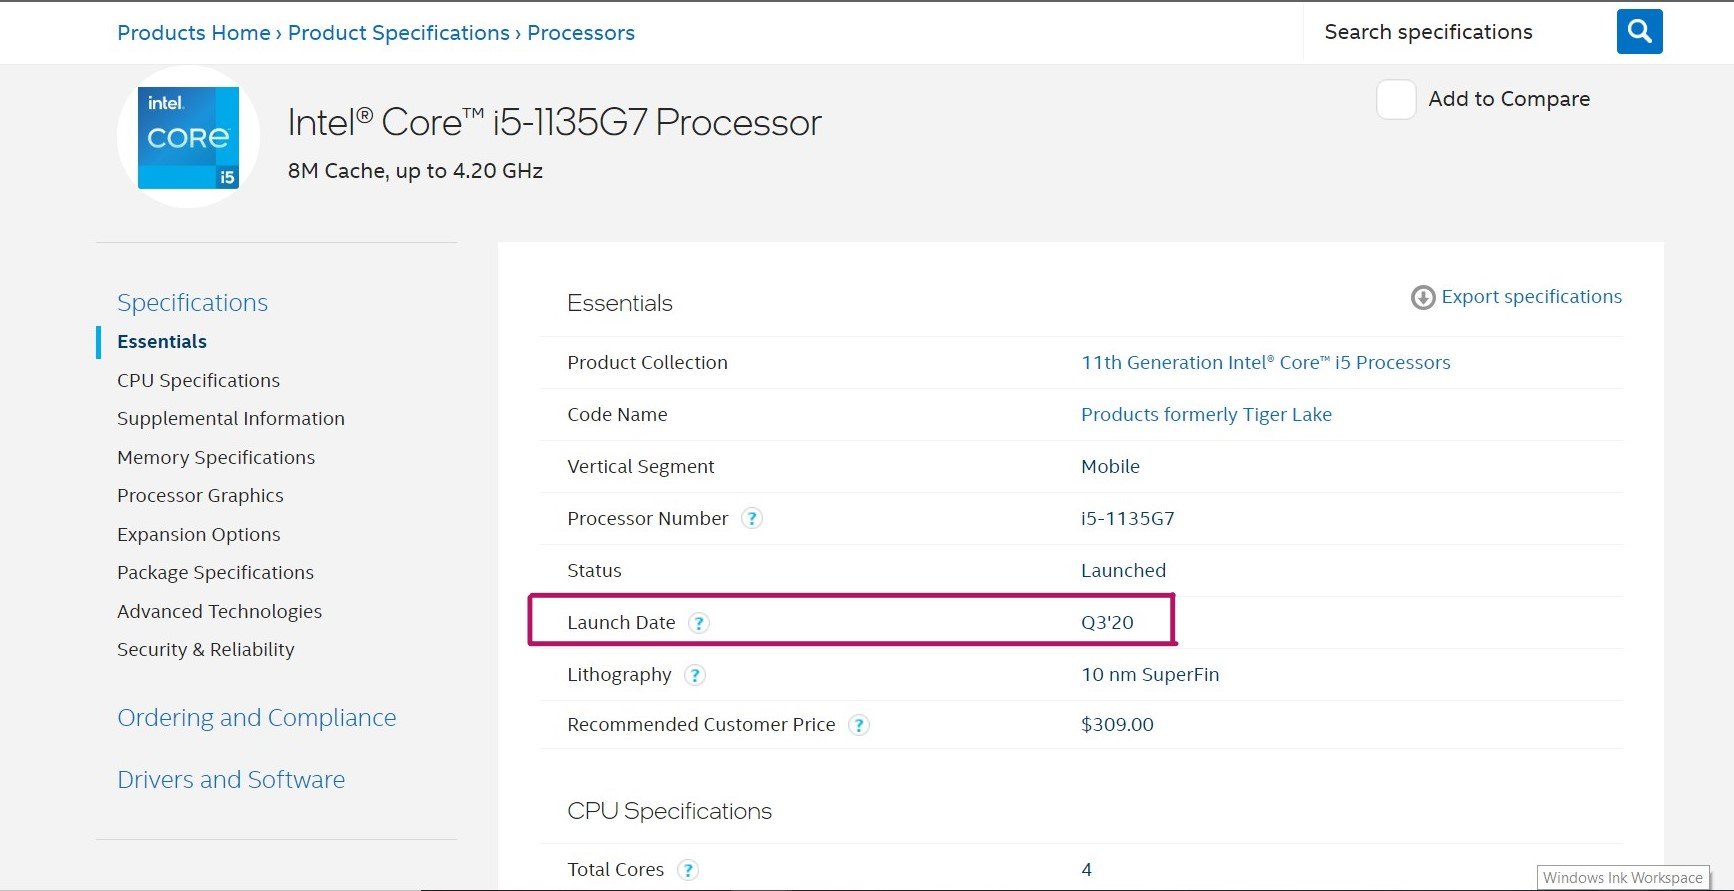
The launch date in the above screenshot means that this CPU, in particular, was launched in the third quarter of 2020.
One thing to keep in mind is that the age of your processor might not necessarily be the age of your computer. Newer laptops and computers can, by all means, use older processors so this is more of an estimate to get a ballpark date more than anything.
4. Check The “Date Created” Information of Folders In Your C Drive
As long as you haven’t reformatted your hard drive/SSD after purchasing your computer or reinstalled Windows at any point in time, the date when Windows was originally installed should be the same as the date when some folders on your C drive were created.
This, however, is not a bulletproof method because you will find some files that are way older.
For example, you might find applications such as Microsoft Visual C++ 2005 with a creation/ modification date of 2005/2006. So, this method is best used to cross-check the information you obtained through other aforementioned methods.
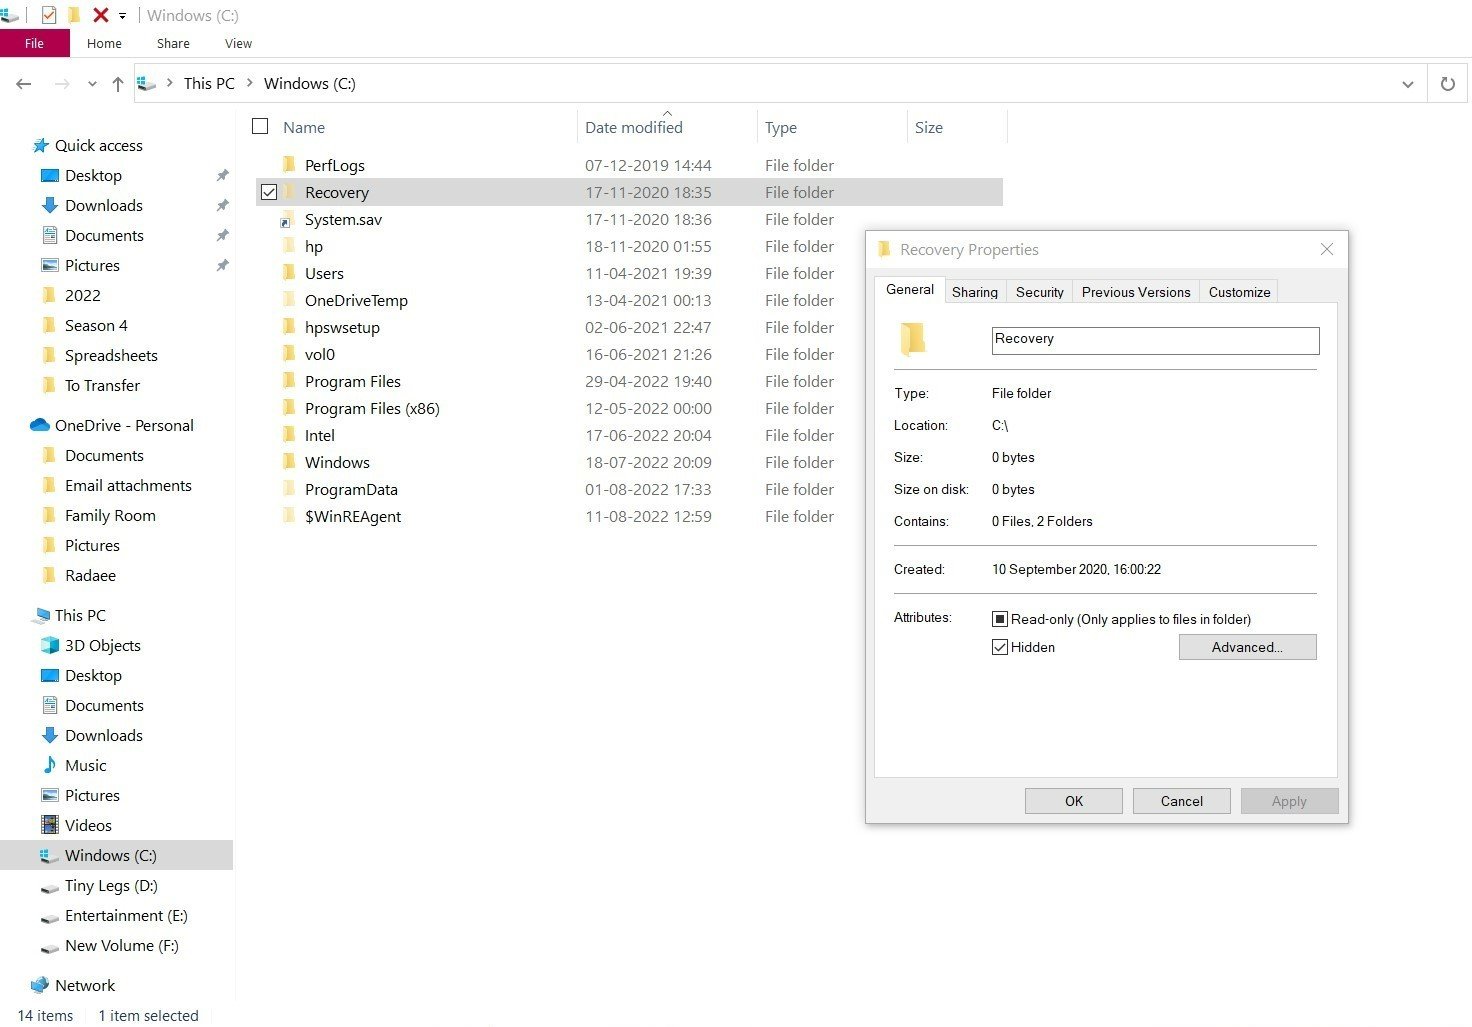
To check the “date modified” of your C drive, go to My PC and double-click on Local Disc (C:).
Right-click on the files and select Properties. Under the General tab, look for the Created row. This could give you a rough estimate of your computer’s age.
5. Check Windows Installation Date
The date when your Windows was installed could provide a bit of information as to how old your computer really is.
Note: There might be a temporal discrepancy between your PC’s manufacturing date and the moment when Windows was installed. Your system might have been shelved for a few months and the vendor could have installed the OS only at the time you purchased it. So, take this information with a grain of salt.
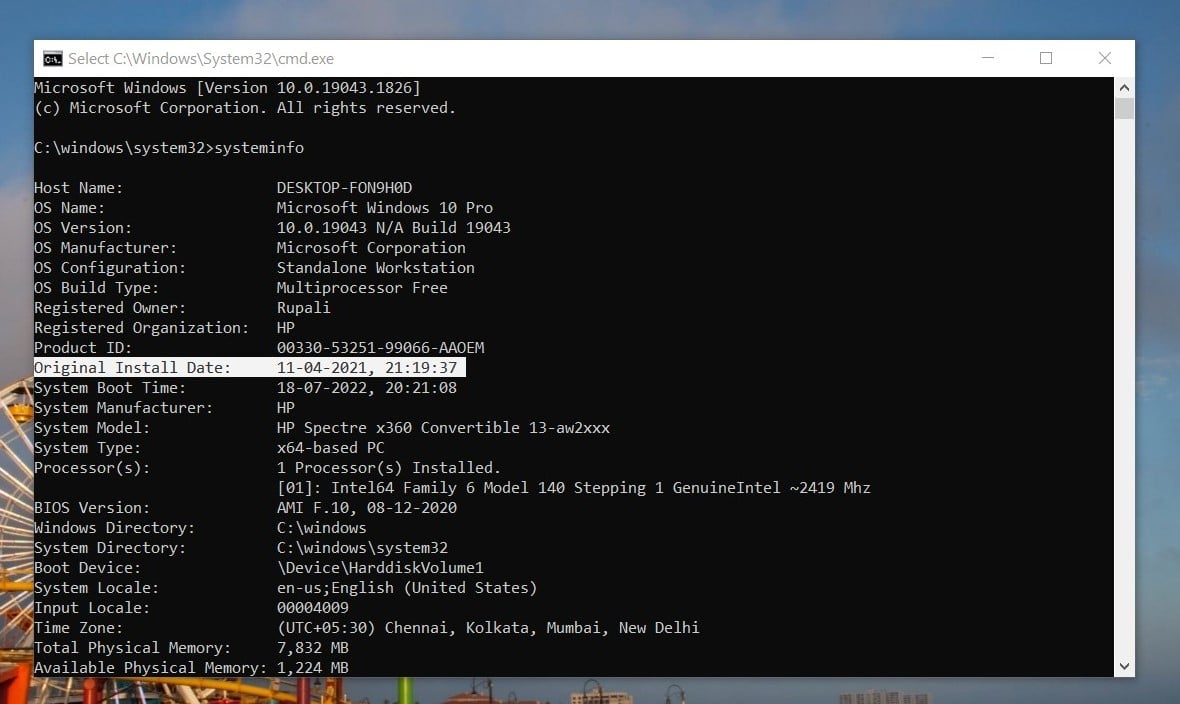
To find out your Windows installation date, open the Command Prompt and type the following command: systeminfo. (Refer to method #2 for this) Look for the Original Install Date row.
How Old Is Your Mac Computer?
When it comes to Apple computers (those running macOS), there is a very easy way to find out the age of your device.
Basically, all systems running Windows rely on various different companies to manufacture their hardware components. Apple, on the other hand, has much greater control over everything that goes into its computers.
To find out how old your Mac is, do the following:
- Boot up your Mac and click on the Apple icon in the top-left corner.
- Click on About This Mac → More Info.
- Under Overview, you’ll find your device’s serial number.
- Go to Apple’s Check Coverage Website and enter your serial number. Here you will find the information you need.
- Alternatively, you can also click on System Report under Overview.
FAQ
Do I Need to Replace My Entire Device or Just a Few of Its Components?
That depends on how old your computer is, really.
If your computer is more than a few years old — and repairing/replacing its components would be costlier than expected (or what is reasonable) — then buying a brand new PC would definitely be the way to go.
On the other hand, if you feel like your device just needs a small upgrade or two and is otherwise fine, try to find the biggest bottlenecks in your system and upgrade accordingly.
How Do I Know When to Replace My Computer?
Here are a few telltale signs that your computer needs an upgrade:
- Start-up and shutdown times are slow
- It constantly runs hot
- The fans become noisy
- Your screen starts flickering and/or freezing frequently
- Software crashes happen a lot more often than they should
Will I Shorten the Lifespan of My Computer by Not Powering It Off?
Leaving your computer powered on does tend to chip away at its lifespan over a period of time, but this really isn’t a cause for concern.
The main reason I don’t recommend this is because it will result in higher power usage (and, by proxy, electricity bills), which isn’t particularly friendly to either your wallet or the environment.
Over To You
By following these methods, you should easily be able to gather more information regarding your computer and the age of its components.
What is the longest any of your devices have lasted? Let us know in the comment section down below and, in case you need any help, head over to our forum!
![How Old Is My Computer? [5 Easy Ways to Find Out] How Old Is My Computer? [5 Easy Ways to Find Out]](https://www.cgdirector.com/wp-content/uploads/media/2022/12/How-Old-Is-My-Computer-5-Methods-to-Find-Out-Twitter-1200x675.jpg)

![The Best Time to buy Computer Parts [Updated] The Best Time to buy Computer Parts [Updated]](https://www.cgdirector.com/wp-content/uploads/media/2019/10/Best_time_to_buy_PC_parts_Twitter-1200x675-594x335.jpg)
![Is GIGABYTE a Good Brand? [2024 Update] Is GIGABYTE a Good Brand? [2024 Update]](https://www.cgdirector.com/wp-content/uploads/media/2023/07/Is-GIGABYTE-a-Good-Brand-Twitter-594x335.jpg)

1 comment
13 December, 2024
Thank you.
Great info on bios date byt systeminfo cmd